Time Zone Clock
Turning a craft fail into a win, thanks to my craft coach
Do you have a loved one in a different time zone? Have trouble remembering what time it is there when you want to call? If you answered yes, then this easy craft is for you.
Very recently my family left Florida (and sadly our wonderful friends Libby and Cam) and moved to Iowa so that we would be closer to extended family during the next chapter in our military life. My hubs, Steve, was going to Korea for his next assignment. When I was still in college and dating my future husband, he had joined the Army and was living in Germany. I had two cheap clocks hanging on my wall to tell the current time and the time where he was. Korea is 14 hours ahead of us in the central time zone and I knew I wanted to have the two clock thing again. So I came up with this craft.
First, I found cute clocks at Walmart for only $3.97!
 |
| Score! |
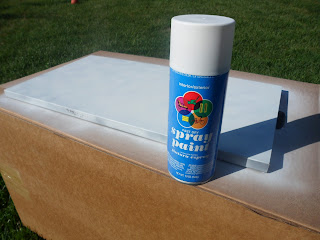
Next, I went to our glorious stash of boards from Ikea and found a board big enough to fit both clocks and cut it to size on our table saw. I used a sanding block to sand the edges and here is where I SHOULD HAVE SANDED THE SURFACE of my board so the the spray paint would have adhered since my board already had a finish on it. (If you are working with an unfinished wood board then you shouldn't have to sand it.) I grabbed the only white spray paint we had, which was the really crappy cheap stuff from Walmart and sprayed the top and sides.
It left an uneven, cloudy-looking coat which I liked so I left it.
It left an uneven, cloudy-looking coat which I liked so I left it.
Next, I used my Silhouette and some Con-tact paper to make a chevron stencil for painting the aqua color to match my living room.
(Did you know you can use cheap, regular old con-tact paper in Silhouette or Cricut, just like vinyl? It works like a charm, but make sure to test your cut setting so that you don't cut right thru it. I had to dial my settings down to a thickness of 1!) You can pick any kind of pattern and hand cut on paper or Con-tact or use painter's stencils from a hardware store if you don't have a craft cutter.
After my chevron pattern was cut, I applied it to my board and pulled off every other zig zag to expose the space I wanted to paint.
See where the Con-tact lifted the paint? Oops. I shoulda sanded... So, I think to myself, I'm not going to sweat this because that part will be painted aqua and covered by a clock. It was only a little taste of what was coming. I shoulda sanded the whole surface...
I crack open a beer at this point because, well, let's get real, drinking makes crafting more fun and easier (especially when things aren't going your way). Am I right, people?
So I grab my board and aqua paint and head outside. I scatter drips of delicious aqua craft paint on my board and then my neighbor pops out his backdoor and says, "Hey, Sarah! I'm going to take this opportunity to finally introduce you to my wife." I walk away from the globs of paint that I know will start drying in the sun and nice breeze and go to the fence to exchange pleasantries.
Tick. Tock. Tick. Tock.
When we are done talking (very nice lady, btw), I quickly spread it around with my foam brush. I can see rings of dried paint. Argh. I add a little more paint and it helps.
OK, don't sweat it. It's going to be sanded and roughed up to look weathered. It'll be OK.
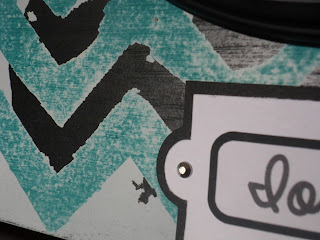
The paint dries quickly and I start pulling off the Con-tact. Paint is peeling off with each strip.
 |
| Oh schnitzel! |
I text Libby a pic titled "Complete *#$% FAIL". My 5yo daughter runs by and says, "Awesome, Mom!" But I'm not feeling it. I go inside and sip my beer while I wait for Lib to respond. I keep looking at it in disappointment. Sam Adams starts to convince me it kinda looks cool. Libby texts, "Cam and I think it looks great. We like the fail. Turn your fail into a win!!!"
OK, I'm going with it.
Now, I get my sanding block and go to town. (Be sure to sand in one direction, with the grain.) I'm now ready to position the clocks on the board to see where I want to place them.
Handy Tip: An easy way to know where to hammer in a nail is to put a little dot of toothpaste on the hanger part of the object you are hanging. Press it against the wall, or in this case, board and when you pull it back a little paste is left exactly where the nail should go.
 |
| See the paste on the clock hanger? See the paste right below the tube hole on the tip of the chevron peak? Sorry, it's hard to see. |
Hammer in a nail and wipe off the paste. Bam!
I set the time on the clocks, then make labels/tags with my Silhouette and glue them under their respective clock.
I'm pretty happy with it despite all of the little mishaps. Moral of the story is to find the good in each situation. Turn your fail into a win. Be thankful for a positive friend that can make you look at things differently. I'm so blessed to have a pretty kick-ass craft coach in my corner.
Thank you, Sarah B! I love this idea of having two clocks...wish I would have thought of doing that while my hubster was depolyed for 19 months! I just love how the chevron turned out, peeled paint and all! Great job!!! Any other military wives out there with a great idea like this?!? Please share what you do during deployments....I would love to hear from you!
Libby :)
Making The World Cuter


No comments:
Post a Comment
I LOVE comments!!!!